
Quick Answer: How to Migrate WooCommerce to Shopify Without Losing SEO
You can move a WooCommerce store to Shopify and keep most of its SEO value, but only if you treat the project as more than a product and customer import. URLs, search metadata, internal links, backlinks, image data, and structured data all have to make the trip too.
Before you change your domain or launch the new storefront, put an SEO migration plan in writing. Every WooCommerce URL worth keeping needs a destination on Shopify, with a permanent redirect wherever the address changes.
A WooCommerce to Shopify migration that preserves your SEO data generally follows these steps:
- Crawl the existing WooCommerce site and document its indexed, linked, and high-traffic URLs.
- Export products, variations, categories, pages, blog posts, images, and store information.
- Save SEO titles, meta descriptions, canonical information, image alt text, and other metadata.
- Build a one-to-one URL map wherever possible and set up 301 redirects for every URL that changes.
- Check Shopify’s canonical tags, structured data, XML sitemap, robots.txt, and indexing settings.
- Test the new storefront before launch, then monitor Google Search Console and Google Analytics afterward.
Even with careful preparation, rankings and traffic often dip temporarily while Google discovers and processes the new URLs. Google advises monitoring the migration, checking redirects, and keeping permanent redirects in place for at least one year.
For more detail, see Google’s official site migration documentation.
What Is a WooCommerce to Shopify SEO Migration?
A WooCommerce to Shopify migration moves an online store from WordPress and WooCommerce to Shopify: products, content, customer records, and the functionality the business relies on. The SEO side of the project is about keeping the signals search engines have built up for your site while the platform, URL structure, templates, and technical setup all change underneath it.
Take a typical product page. On WooCommerce, it might live at:
https://example.com/product/organic-coffee/On Shopify, the same product would likely sit at:
https://example.com/products/organic-coffeeThe product is still there, but its address is different. Google, customers, and other websites may keep using the old one. Without a redirect, visitors hit a 404, and search engines have to find and evaluate the new URL on their own.
SEO Data That Needs Attention During Migration
Not all of this data moves the same way. Some of it transfers through standard CSV exports, while the rest needs dedicated tools, manual mapping, or custom development.
| SEO or store element | What needs to be preserved |
|---|---|
| Products | Product names, descriptions, SKUs, variations, images, prices, and attributes. |
| Categories and collections | Category descriptions, hierarchy, product relationships, and landing-page content. |
| Pages and blog posts | Content, headings, images, publication information, and existing search visibility. |
| SEO metadata | SEO titles, meta descriptions, indexing directives, and canonical information. |
| Image information | Image files, descriptive filenames, alt text, and key image URLs. |
| URL structure | Existing URLs, replacement destinations, and permanent redirect rules. |
| Structured data | Product, organization, breadcrumb, and other schema markup. |
| Internal and external links | Navigation links, contextual links, backlinks, and important referring URLs. |
Treat these as separate workstreams rather than one product import. A clean import doesn’t mean your SEO setup came along with it.
Why Can WooCommerce to Shopify Migration Affect SEO Rankings?
WooCommerce and Shopify differ in their URL conventions, theme structures, and default technical SEO settings. Those differences can change how search engines crawl, interpret, and index your pages.
1. Changes to Existing URLs
WooCommerce lets you configure your permalink structure. Shopify uses fixed paths for products, collections, pages, and blog content. A product, category, or article may not keep its original path after migration, and if the old URL stops working without a permanent redirect, both users and search engines land on a dead page.
2. Missing SEO Titles and Meta Descriptions
Many WooCommerce stores manage page titles, meta descriptions, canonical URLs, and indexing settings through Yoast SEO or Rank Math. Importing product descriptions and page content doesn’t carry those plugin settings over to Shopify. The original values have to be exported, mapped, transferred, and checked.
3. Changes to Page Content and Internal Linking
A new Shopify theme may bring different templates, heading structures, menus, and collection layouts. If important content drops out, or internal links still point to old WooCommerce URLs, crawlers and visitors get a weaker version of your site.
4. Missing or Incorrect Structured Data
WooCommerce themes and SEO plugins often generate schema markup for products, breadcrumbs, and organizations. Shopify themes and apps produce their own markup, and it may not match. Rebuilding a storefront without reviewing it can leave you with missing properties, duplicate markup, or incorrect product details, so validate the output instead of assuming the new theme reproduces the old setup.
5. Indexing and Crawlability Problems
Development stores are often password-protected or set to discourage indexing, and those settings need to be reviewed before launch. Stray noindex directives, incorrect canonical tags, robots.txt restrictions, or an outdated sitemap can also keep search engines from finding the new pages.
Google covers these risks in its site move and URL change guidance.
Step 1: Prepare Your WooCommerce Store Before Migration
Before you export anything or build the Shopify storefront, record exactly what the current site looks like. That baseline lets you compare the old and new stores after launch and catch missing pages, bad redirects, and unexpected changes.

1. Crawl the Existing WooCommerce Website
Use a crawler such as Screaming Frog SEO Spider to collect your current URLs along with their response codes, titles, meta descriptions, canonical tags, headings, and internal links. Don’t stop at product pages. The crawl should also cover:
- Product pages and variation URLs, where they exist.
- Product category and subcategory pages.
- Static pages such as About, Contact, Shipping, and Returns.
- Blog posts, informational articles, and resource pages.
- Brand, manufacturer, and other landing pages that earn traffic.
- Image and downloadable file URLs that matter.
Export the results to a spreadsheet. It becomes the foundation of your migration URL inventory.
2. Identify Pages That Already Generate Organic Traffic
In Google Search Console, open the Performance report for your current WooCommerce property and export page-level clicks, impressions, average position, and queries. Twelve months of data works for many stores, and it helps smooth out seasonal swings. If your business is highly seasonal, pull a longer history.
Flag the pages doing real work for you, such as:
- Products with steady non-branded search clicks.
- Category pages ranking for commercial search terms.
- Blog posts bringing in informational traffic.
- Landing pages that produce leads or sales.
- Pages with high impressions but a low click-through rate.
These pages deserve the most care during content transfer and URL mapping. A page with modest traffic can still matter if it has strong backlinks or sits on an important customer path.
3. Export Backlink and Referring Domain Information
Pull your backlink data from the Links report in Google Search Console and, if you have one, a third-party backlink tool. Note the key referring domains and which of your pages they point to. A link to a well-established buying guide or category page shouldn’t get lost just because its URL is about to change. This list also tells you which redirects to prioritize and which external links are worth asking site owners to update.
4. Record Existing SEO and Analytics Performance
Document organic search and business performance before launch: GA4 landing-page data, ecommerce events, conversions, and Search Console metrics. Confirm that ecommerce tracking works correctly first. If it doesn’t, a tracking difference after launch can look like a real drop in sales or traffic.
5. Back Up the Existing Store
Make a full backup of the WooCommerce site before you change anything. That means the WordPress database, uploaded media, theme and plugin configuration, and store records. Keep a separate copy of your exported product, customer, order, and content data, store it securely, and limit access to customer information.
6. Build a Migration Inventory
Combine everything above into a single inventory listing each URL, its content type, how it performs, and where it’s going on Shopify. You’ll expand this same sheet into your redirect map in Step 4.
| Inventory field | Example information |
|---|---|
| Original URL | Existing WooCommerce product or article URL. |
| Content type | Product, collection, page, or blog post. |
| Organic performance | Clicks, impressions, and important queries. |
| Backlink importance | Referring domains and inbound links. |
| New Shopify URL | Approved destination after migration. |
| Migration status | Pending, imported, reviewed, or verified. |
Don’t switch the domain until the key inventory records have been reviewed.
Step 2: Migrate WooCommerce Products, Categories, Pages, and Blog Content
Importing product names and prices is the easy part. A good migration also keeps the information customers use to decide what to buy and the content search engines use to understand each page. Before importing, list the data fields for each content type and decide how each will be represented in Shopify.

1. Migrate WooCommerce Products and Product Variations
Start by exporting your catalog with the built-in WooCommerce product CSV exporter or a migration app that supports the fields you need. Review the export before importing it into Shopify, paying particular attention to:
- Product names and descriptions.
- SKUs and inventory information.
- Regular and sale prices.
- Variations and their attributes.
- Product and gallery images.
- Categories and tags.
- Weight, dimensions, and shipping details.
- Product status and availability.
Variable products often need extra preparation because Shopify handles variations through its own product and variant structure. After importing, check variant combinations, option names, inventory tracking, and SKU relationships. Also scan product descriptions for WordPress shortcodes, embedded widgets, and HTML that may not render correctly in a Shopify theme.
2. Preserve Product SEO Information
A product description is written for customers. The SEO title and meta description are what search engines and searchers see in results. Shopify won’t import the SEO plugin fields from WooCommerce on its own, so handle them as a separate dataset and validate them independently. For each important product, preserve:
- SEO title and meta description.
- Product name and main description.
- Key product attributes.
- Image alt text.
- Canonical URL information, where it applies.
- Internal links within the description.
3. Convert WooCommerce Categories into Shopify Collections
WooCommerce organizes products with categories and tags. Shopify relies mainly on collections, which you can build manually or with automated conditions. A store with a nested coffee category might translate like this:
WooCommerce
  Coffee
    Organic Coffee
    Ground Coffee
    Coffee Beans

Shopify
  Collections
    Organic Coffee
    Ground Coffee
    Coffee Beans
Keep the commercial purpose of your existing category pages intact. Don’t strip out useful category descriptions or shift their targeting without a content strategy behind the change. During conversion, review:
- Collection names and descriptions.
- Product membership and filtering rules.
- Existing category landing-page content.
- SEO titles and meta descriptions.
- Navigation and internal links.
- Old category URLs and their new destinations.
If an old category ranks well, map it to the closest matching Shopify collection, not the homepage.
4. Transfer WordPress Pages and Blog Posts
Informational content gets overlooked in ecommerce migrations, yet it often drives a meaningful share of organic traffic, backlinks, and customer education. Decide which WordPress content should stay live, including:
- Buying guides and educational articles.
- Product comparison pages.
- Shipping and returns information.
- Frequently asked questions.
- Brand and company information.
- Promotional and campaign landing pages.
Shopify supports blogging, but its content organization and URL structure differ from WordPress. Set up the destination blog first and assign each article to it. An article that lives at this WordPress address:
https://example.com/blog/how-to-choose-coffee/could end up here on Shopify:
https://example.com/blogs/guides/how-to-choose-coffeeCarry over each article’s content, headings, images, outbound references, and contextual links. If the URL changes, add it to the redirect inventory.
5. Preserve Product Images and Alternative Text
Product photos affect usability, buying decisions, and image search visibility. After migration, confirm that the original files transferred and that the storefront shows the right images. Check:
- Featured images and galleries.
- Filenames that carry useful descriptive context.
- Existing alt text.
- Image dimensions and quality.
- Image loading on mobile devices.
- Images embedded in blog posts and pages.
Write alt text that describes what the image shows when it adds information, and don’t stuff it with keywords or add descriptions to purely decorative images. Shopify serves uploads through its own image infrastructure, so old WordPress image URLs will change. Update the image references that matter and avoid breaking external references to them unnecessarily.
6. Handle Customer, Order, and Other Store Data Separately
SEO work shouldn’t crowd out the operational side of the move. Customers, historical orders, discount configurations, and other records each need their own migration and verification process.
Customer passwords need particular care. Standard migration methods generally can’t bring WooCommerce password hashes over as usable Shopify passwords, so plan for a password reset or account activation step and tell customers about it ahead of time. Check historical order and customer imports against your chosen migration method and Shopify plan, and test your integrations, fulfillment workflow, payment setup, and customer notifications before launch.
Step 3: Transfer Yoast SEO and Rank Math Metadata to Shopify
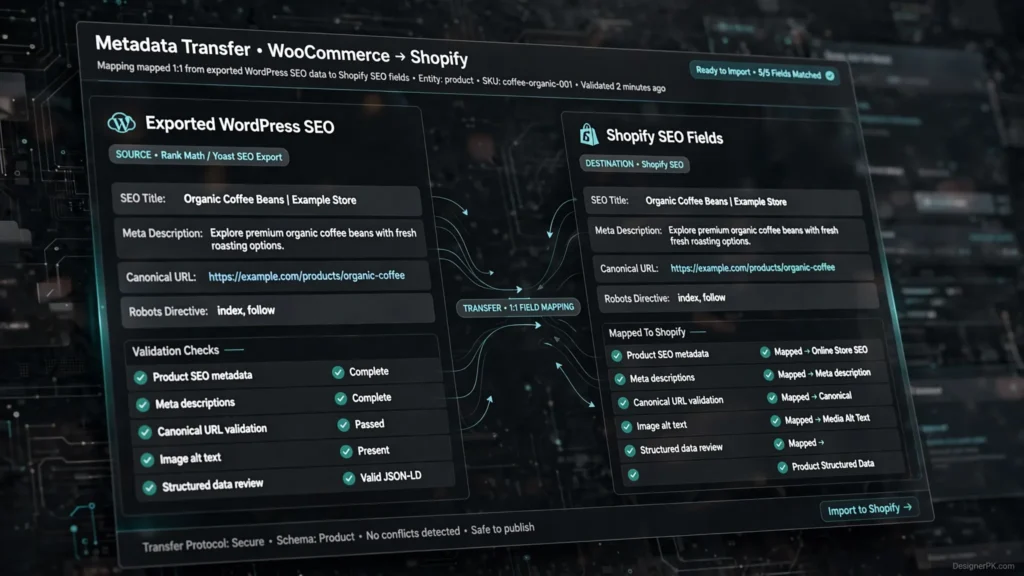
Preserving the metadata from your WordPress SEO plugin is one of the most important parts of the migration. Yoast SEO and Rank Math store page-specific titles, descriptions, and indexing settings that a standard product or content export doesn’t include. If you skip this step, those values may be lost or replaced by auto-generated ones.
What SEO Metadata Should You Export?
Before you remove or change the WordPress installation, export the SEO data for your important pages and products separately.
| Metadata field | Migration requirement |
|---|---|
| SEO title | Preserve the intended search result title. |
| Meta description | Keep the existing page-specific description where it’s still accurate. |
| Canonical URL | Review and update to the correct Shopify destination. |
| Robots directives | Preserve intentional indexing restrictions. |
| Open Graph metadata | Review social sharing titles, descriptions, and images. |
| Twitter card metadata | Preserve social preview settings. |
| Schema configuration | Identify custom structured data that needs to be recreated. |
How to Transfer Yoast SEO Data to Shopify
Yoast publishes a Shopify SEO data migration process for moving SEO information out of an existing WordPress site. Follow its current documentation for the supported export and import workflow, since the exact steps may change. In general, the process looks like this:
- Back up the WordPress site and database.
- Export the Yoast SEO data for products, pages, and posts.
- Match each record to its Shopify product, collection, page, or blog article.
- Run the import using the Yoast Shopify migration template and process.
- Confirm that titles and descriptions appear on the correct Shopify pages.
- Review canonical information, indexing directives, and any other imported settings.
- Inspect the rendered HTML to confirm the metadata is actually published.
Read the official Yoast Shopify SEO migration documentation before you settle on a procedure.
How to Transfer Rank Math SEO Data to Shopify
Rank Math can export its plugin data from WordPress, but an export isn’t a migration. Shopify uses a different metadata system, so you have to match the exported values to the right destination pages and convert them into fields that Shopify or an SEO app supports. A practical workflow:
- Export the product, page, and post data from WordPress.
- Pull the page-specific SEO titles and meta descriptions out of the Rank Math fields.
- Match each source record to its Shopify destination.
- Review custom canonical URLs and indexing directives one by one.
- Import supported metadata through Shopify’s SEO fields or a compatible app.
- Recreate custom schema and other advanced SEO features where needed.
- Validate the results through the rendered HTML and technical SEO testing.
Don’t copy WordPress plugin database fields straight into Shopify. Some are plugin-specific settings that Shopify can’t use.
Where Should SEO Metadata Be Stored in Shopify?
Shopify’s search engine listing settings cover products, collections, pages, and blog posts. They let you customize the search result title, description, and URL handle for each one. Advanced requirements may call for an SEO app or custom development, depending on what you’re transferring and what your theme supports.
Once the data is in, check the published HTML rather than relying only on what the Shopify admin shows. For more detail, see Shopify’s official SEO guidance.
Important: Do Not Copy Old Canonical URLs Unchanged
A canonical URL that made sense on WooCommerce can cause trouble on Shopify. If an old canonical points to a page that no longer represents the primary version of the content, pasting it into Shopify creates conflicting signals.
Look at each custom canonical and decide whether it should point to the new Shopify URL, another preferred version, or a legitimate alternative. For standard product and collection pages, Shopify normally outputs a suitable canonical on its own. Step 6 covers how to check it.
Review noindex and other robots directives too. A restriction that was right during development must not stay on the live store.
Step 4: Create a WooCommerce to Shopify URL Mapping Plan
URL mapping is one of the most important technical tasks in a platform migration. WooCommerce and Shopify structure their URLs differently, so many of your product, category, and content pages will need new destinations. The mapping spreadsheet pairs each important old URL with its Shopify replacement, and it drives both the redirect setup and the post-launch testing.
Understand the Differences Between WooCommerce and Shopify URLs
WooCommerce builds product and content URLs from your WordPress permalink settings. Shopify uses predefined paths for each resource type.
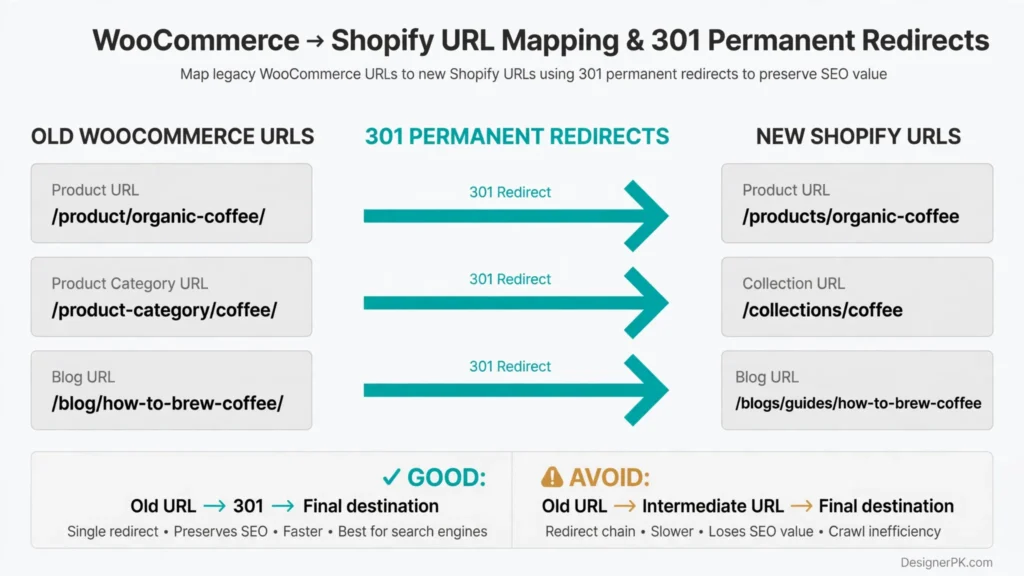
| WooCommerce URL | Possible Shopify URL | Content type |
|---|---|---|
| /product/organic-coffee/ | /products/organic-coffee | Product |
| /product-category/coffee/ | /collections/coffee | Collection |
| /about-us/ | /pages/about-us | Page |
| /blog/how-to-brew-coffee/ | /blogs/guides/how-to-brew-coffee | Blog article |
These examples are illustrations, not automatic equivalents. Your actual destinations depend on your store’s configuration, content organization, and URL handles.
Build a URL Mapping Spreadsheet
Extend the inventory you built in Step 1 rather than starting a new document. Add a destination URL and redirect status for each important source page, so the sheet includes:
- Old WooCommerce URL.
- New Shopify URL.
- Content type.
- Existing HTTP response status.
- Organic clicks and impressions.
- Backlink importance.
- Redirect implementation status.
- Final validation result.
A single row might look like this:
Old URL:
https://example.com/product/organic-coffee/

New URL:
https://example.com/products/organic-coffee

Redirect:
301 Permanent

Validation:
Pending
Start with the URLs that earn organic traffic, have valuable backlinks, or support key customer journeys. But cover every indexed and internally linked URL, not just the top performers.
Map URLs to Their Closest Relevant Destinations
Each redirect should send visitors to a page that actually fills the role of the original. An old coffee product page should go to its Shopify counterpart, not the homepage along with every other retired URL.
If a product is permanently discontinued and has no real replacement, you have three reasonable options: keep the page live with useful information, point it to a genuinely equivalent product, or let it return an appropriate unavailable status. Sending every missing URL to a broad collection page is a common shortcut. It confuses visitors and may be treated by search engines as a soft 404.
Handle Shopify’s Fixed URL Prefixes
Shopify uses fixed prefixes for each resource type:
/products/
/collections/
/pages/
/blogs/
These can’t be swapped for arbitrary WordPress permalink structures, so even a store with a custom WooCommerce product path will end up with the standard Shopify product format.
Shopify’s built-in redirect tool also doesn’t accept every possible source path. Certain reserved prefixes, such as /products, /collections, and /pages, need special handling when you plan redirects. Check the current Shopify URL redirect documentation before you finalize the spreadsheet.
Step 5: Implement 301 Redirects from WooCommerce to Shopify
A 301 redirect is a permanent HTTP redirect that tells browsers and search engines a page has moved. When a WooCommerce URL changes during migration, a correct 301 sends visitors to the replacement page and gives search engines a clear signal about where the content lives now. This matters most for established stores with indexed products, categories, blog posts, and external backlinks.
How Shopify URL Redirects Work
Shopify has built-in URL redirects that let you send eligible old paths to new destinations. You can create them one at a time in the admin, or import them in bulk from a CSV file for larger migrations. A typical redirect file has two columns:
Redirect from,Redirect to
/product/organic-coffee/,/products/organic-coffee
/product/coffee-grinder/,/products/coffee-grinder
/product-category/coffee/,/collections/coffee
/about-us/,/pages/about-us
Use relative paths in the import file, and check the required CSV format against Shopify’s current documentation.
Implement Redirects in Shopify
- Finish the URL mapping spreadsheet and remove duplicate source paths.
- Confirm that every destination page exists on the new Shopify store.
- Open the URL redirects section in the Shopify admin.
- Create individual redirects or prepare a CSV import file.
- Import the mappings and review any rejected records.
- Test a sample of URLs, then crawl the full redirect list.
- Record the final status in the migration spreadsheet.
A successful CSV import doesn’t prove every redirect is right. Validation has to confirm that each old URL reaches the intended page and that the page returns the expected response.
Understand Redirect Chains
A redirect chain happens when an old URL passes through more than one redirect before it reaches the final page. Each extra hop slows crawling and makes troubleshooting harder.
Chain (avoid):
Old WooCommerce URL
  -> 301 -> Intermediate Shopify URL
  -> 301 -> Final Shopify Product URL

Direct (preferred):
Old WooCommerce URL
  -> 301 -> Final Shopify Product URL
Point each old URL straight at its final destination. Before creating new redirects, review any that already exist. Old WordPress redirect plugins, server rules, CDN settings, and Shopify redirect records can interact in unexpected ways.
Prevent Redirect Loops
A redirect loop happens when URLs keep redirecting to one another and never reach a final page. The browser gives up and shows an error.
/old-product/ -> /another-product/ -> /old-product/Look for conflicting rules between sources and destinations. Trailing slash variations, URL normalization, leftover server-level rules, and redirects set up through external apps are the usual culprits.
Identify Broken URLs and Incorrect Destinations
After the redirects are live, crawl your original URL list and check the response codes. Look for:
- Old product URLs that unexpectedly return 404 errors.
- Category URLs redirecting to unrelated collections.
- Destinations returning server errors.
- Redirect chains with unnecessary intermediate URLs.
- Redirect loops.
- URLs landing on the homepage with no relevant replacement.
- Records rejected because of Shopify’s path restrictions.
Keep each old URL in the inventory until its final destination and response status have been tested, not just until its redirect exists.
Validate Redirects After the Domain Switch
Test redirects before the production domain is connected to Shopify, and again right after. A crawler or HTTP response checker will show whether each old URL reaches the correct final page. For every important URL, confirm that:
- The original URL returns the expected permanent redirect.
- The destination loads successfully.
- The final response isn’t an unexpected 404 or 5xx error.
- The destination is relevant to the original content.
- The page has no unintended noindex directive.
- The canonical URL points to the intended primary page.
Google recommends permanent server-side redirects when URLs change and says to keep them active for at least one year. For URLs with valuable backlinks or an established following, keeping the redirects longer is often sensible. See Google’s documentation on redirects and Google Search for technical details.
Step 6: Configure Shopify Technical SEO After Migration
Once your content is in and your redirects are set, review Shopify’s technical SEO configuration. Search engines need to find your important pages, understand which URL is preferred for each, and reach the content they need to index. Don’t assume your theme or migration app reproduced every technical setting from the old WooCommerce site.
1. Review Shopify Canonical Tags
A canonical tag names the preferred URL for a page when similar or duplicate versions exist. On WooCommerce, canonicals may come from Yoast SEO, Rank Math, or the theme. Shopify themes generally output them too, but check the result after migration. A product page should point to its own preferred product URL, with a tag like this:
<link
  rel="canonical"
  href="https://example.com/products/organic-coffee"
/>
Check the canonical output on each major page type:
- Product pages.
- Collection pages.
- Static pages.
- Blog articles.
- Important filtered or parameterized URLs.
Products reached through collection paths deserve a closer look. Shopify themes may link to the same product through several URLs, so canonicals need to stay consistent. Also watch for a theme and an SEO app each adding their own canonical tag. Inspect the rendered HTML and make sure only one tag appears and that it names the right URL.
2. Check the Shopify XML Sitemap
Shopify automatically generates an XML sitemap at the standard location:
https://example.com/sitemap.xmlShopify manages this file, so you usually don’t need to create a replacement. After you connect the production domain:
- Open the sitemap URL in a browser and confirm that it loads.
- Review the linked sitemap files.
- Check that your key products, collections, pages, and blog content are included where eligible.
- Look for outdated or unintended URLs.
- Submit the production sitemap in Google Search Console.
Submitting a sitemap doesn’t guarantee indexing. It gives Google discovery information to use when it crawls your site. For details, see Shopify’s XML sitemap documentation.
3. Review Shopify Robots.txt
The robots.txt file gives crawling instructions to compliant search engine bots. Shopify generates one automatically, and its default rules include platform-specific entries. Don’t replace them without understanding how they affect the storefront and its crawlable resources. Open the file and look for restrictions that could block important content:
https://example.com/robots.txtKeep robots.txt and noindex separate in your mind. Blocking a URL in robots.txt doesn’t reliably remove it from Google’s index. To keep a page out of search results, use a noindex directive, and let search engines crawl the page so they can see it. Shopify offers an editable robots.txt template through supported theme functionality, but test any change carefully before publishing. See Shopify’s robots.txt customization guidance.
4. Check Indexing Directives
Pages that should appear in search results must not carry a noindex directive. Review the robots meta tags on your important Shopify pages. The usual migration culprits are:
- Development restrictions left active after launch.
- SEO apps adding unexpected robots directives.
- Theme customizations applying noindex to valuable pages.
- Faulty template conditions affecting entire groups of products.
The URL Inspection tool in Google Search Console shows the indexing status of any important URL.
5. Validate Shopify Structured Data
Structured data gives search engines machine-readable information about a page. For an ecommerce site, the relevant schema types usually include Product, Organization, BreadcrumbList, and Article. Since Shopify themes and apps generate their own markup, include a structured data review in the migration.
On product pages, inspect these properties where they apply:
- Product name.
- Product image.
- Description.
- SKU or other supported identifiers.
- Brand.
- Offer information and currency.
- Availability.
- Aggregate ratings and reviews, when genuinely supported.
Never output review ratings, prices, availability, or other values that don’t match what’s visible on the page. Watch for overlapping Product schema from both a theme and an SEO app. Multiple schema objects aren’t automatically wrong, but conflicting information can cause validation problems.
Test key page templates with Google’s Rich Results Test, and see Google Search Central for guidance.
6. Review Mobile Usability and Core Web Vitals
A new platform brings a new theme, new scripts, new apps, and different rendering behavior. Test the store on mobile devices as well as desktop browsers, and look closely at:
- Largest Contentful Paint (LCP).
- Interaction to Next Paint (INP).
- Cumulative Layout Shift (CLS).
- Mobile navigation and product usability.
- Product image loading.
- Third-party app scripts.
- Cart and checkout interactions.
Use Google PageSpeed Insights to evaluate individual pages and find performance opportunities.
Step 7: Preserve Backlinks and Update Internal Links
Backlinks and internal links connect your store to the rest of the web and to its own content. A migration should keep those connections intact wherever possible.
Preserve Valuable External Backlinks
External sites may link to your product pages, categories, buying guides, blog posts, or other resources. When those URLs change, their Shopify destinations belong in your redirect map. Use the backlink list from Step 1 and prioritize links from:
- Industry publications.
- Established product review sites.
- Business partners and suppliers.
- Blogs and editorial resources.
- Trusted directories and business profiles.
- Sites linking to your popular educational content.
Where you control the referring site, update the link to the new URL directly. Everywhere else, keep the redirect in place so the existing links still lead somewhere useful.
Update Internal Links to New Shopify URLs
Internal links should point straight to the new Shopify URLs, not lean on redirects from old WordPress addresses. That saves unnecessary redirect requests and gives customers a smoother path through the store. Check links in:
- Main navigation and footer menus.
- Product and collection descriptions.
- Blog articles and buying guides.
- Related product sections.
- Breadcrumb navigation.
- Promotional banners and landing pages.
If a blog article used to link to a WooCommerce product, point it at the new Shopify product URL.
Preserve Important Content Relationships
Don’t move pages one at a time without looking at how they connect. Visitors should be able to move naturally between categories, products, buying guides, and related resources. An article on choosing coffee beans, for example, should still link to the matching coffee collection or products on Shopify.
Review navigation and contextual links before launch. A product page that loads fine but no longer connects to the rest of the site is harder for both users and search engines to find.
Step 8: Monitor Organic Traffic After WooCommerce to Shopify Migration
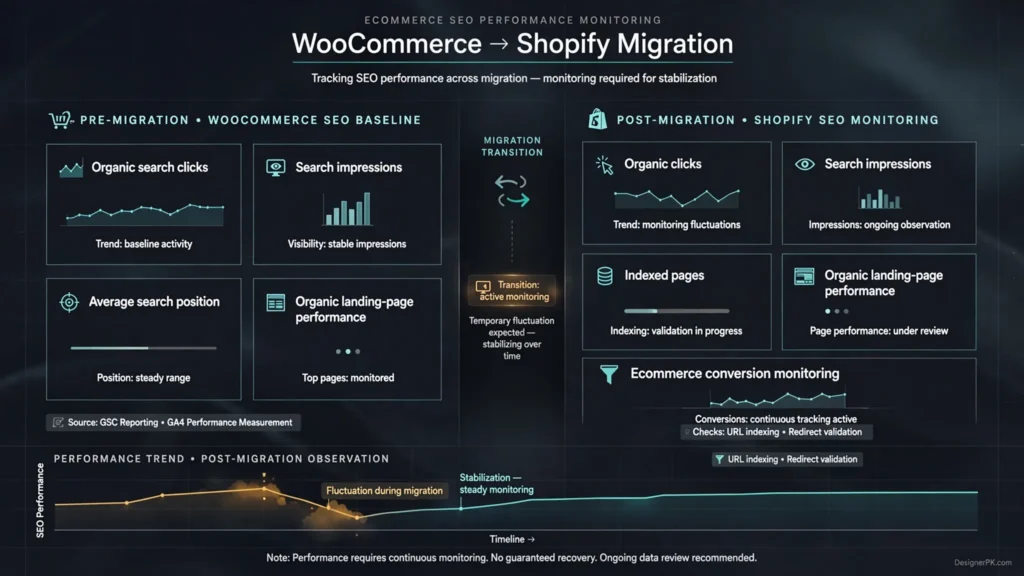
Launching the store doesn’t finish the SEO work. Search engines need time to discover the new URLs, process redirects, and recrawl pages. Use Google Search Console and Google Analytics 4 (GA4) together, since they report different things.
1. Verify the Shopify Website in Google Search Console
Before launch, confirm you have access to the right Search Console property. If your domain isn’t changing, keep using the existing property and check that it covers the correct domain and URL variations. If you’re changing domains as well as platforms, verify the new domain and follow Google’s site move guidance. After launch:
- Confirm the production domain resolves to the Shopify storefront.
- Open the Search Console property for the live site.
- Submit the Shopify XML sitemap.
- Inspect important product and collection URLs.
- Check whether Google can crawl the new pages.
- Review the indexing and page experience reports for unexpected problems.
The URL Inspection tool lets you examine individual pages and request indexing for important updated URLs. A request doesn’t guarantee Google will crawl or index a page right away. See Google’s URL Inspection documentation for more.
2. Monitor Search Performance Changes
Compare the Performance report for the new store against the WooCommerce baseline you documented. Track:
- Clicks: Organic visits from Google Search.
- Impressions: How often your pages appear in search results.
- Average position: The reported average ranking for selected queries and pages.
- Click-through rate: The share of impressions that become clicks.
Look at individual URLs as well as the whole site, because overall traffic can hide problems on specific products or collections. If one collection page loses impressions while the rest of the site holds steady, check that page’s indexing status, canonical URL, content, and redirect before concluding the whole migration has failed.
3. Compare Organic Landing Pages in Google Analytics 4
GA4 reports sessions, engagement, conversions, and ecommerce events. Compare organic landing pages before and after migration to see whether key products and collections still attract visitors and drive business results. Pay particular attention to:
- Organic sessions and landing-page performance.
- Product views and add-to-cart events.
- Checkout starts and purchases.
- Purchase revenue and transaction tracking.
- Changes in conversion rate.
Make sure Shopify’s tracking is set up consistently with the old site. Differences in consent settings, analytics tags, attribution, or event definitions can make comparisons misleading. For help validating ecommerce events, see Google Analytics ecommerce measurement guidance.
4. Investigate Unexpected Traffic Declines
A traffic drop doesn’t automatically mean the redirects are broken. Several technical and business factors can affect search performance after a migration, so work through the symptoms systematically:
| Observed problem | What to investigate |
|---|---|
| Important pages disappear from Google | Indexing directives, canonical tags, crawlability, and page availability. |
| Old URLs return 404 errors | Missing or incorrectly configured redirects. |
| Impressions decline across product pages | Product content, indexing, canonical consistency, and URL mapping. |
| Organic clicks decline but impressions remain stable | Search snippets, titles, descriptions, ranking changes, and search intent. |
| Traffic remains stable but sales decline | Checkout functionality, tracking, pricing, product availability, and conversion usability. |
| Google reports crawl or server errors | Server responses, domain configuration, app behavior, and resource accessibility. |
Compare equivalent periods where you can, and account for seasonality, advertising activity, promotions, and market demand. Avoid making major SEO changes based on a single day’s numbers.
Common WooCommerce to Shopify Migration SEO Mistakes
Most migration problems are avoidable when SEO is part of the project plan from the start rather than a last-minute launch task.
1. Migrating Products Without Their SEO Metadata
A product import brings over names, descriptions, and prices. It doesn’t guarantee that your Yoast or Rank Math titles and descriptions come along.
How to prevent it: Export the SEO metadata separately, map it to the right Shopify resources, and check the published titles and descriptions.
2. Redirecting Every Old URL to the Homepage
Sending unrelated products, categories, and articles to the homepage frustrates visitors and gives search engines no real replacement for the original content.
How to prevent it: Map each old URL to its closest Shopify equivalent, and decide deliberately what to do with discontinued pages.
3. Forgetting Blog Posts and Informational Pages
Teams often focus on products and overlook the educational content that brings in organic traffic and backlinks.
How to prevent it: Put blog posts, buying guides, informational pages, and key landing pages in the migration inventory from the start.
4. Launching With Incorrect Indexing Settings
Leftover development restrictions, noindex directives, or bad robots.txt rules can keep a new storefront out of search results.
How to prevent it: Test crawlability and indexing directives on the live storefront right after launch.
5. Ignoring Canonical Tags and Structured Data
A new theme or SEO app can introduce duplicate metadata, conflicting canonicals, or inconsistent schema.
How to prevent it: Inspect the rendered HTML of representative products, collections, pages, and articles, validate the structured data, and remove conflicting implementations.
6. Forgetting Internal Links
Old WooCommerce URLs tend to linger in product descriptions, blog content, menus, and landing pages.
How to prevent it: Crawl the new Shopify site and update internal links to point directly to the replacement URLs.
7. Failing to Test the New Store Before Launch
Skipping tests on product pages, mobile navigation, cart, checkout, payments, and tracking creates operational problems on top of SEO ones.
How to prevent it: Run a pre-launch quality check across representative devices, browsers, products, and customer journeys.
8. Removing the Old WooCommerce Website Too Early
Deleting the WordPress installation right away makes it hard to recover missing content, verify original metadata, or investigate problems.
How to prevent it: Keep secure backups and your migration records, and leave the old hosting environment available for a transition period, subject to security and business needs.
WooCommerce to Shopify Migration SEO Checklist
Use this checklist to run the migration in three stages. Assign an owner to each task and record its status before moving to the next stage.
Pre-Migration SEO Checklist
- Complete a crawl of the existing WooCommerce website.
- Export important products, categories, pages, and blog posts.
- Record existing SEO titles and meta descriptions.
- Export Yoast or Rank Math metadata.
- Document important canonical URLs and indexing directives.
- Record Google Search Console clicks, impressions, and landing pages.
- Review GA4 organic landing pages and ecommerce tracking.
- Identify valuable backlinks and referring domains.
- Back up the WordPress database and uploaded media files.
- Prepare the Shopify URL mapping spreadsheet.
- Plan product, collection, blog, and page migrations.
- Confirm the domain and DNS migration strategy.
Launch-Day SEO Checklist
- Confirm that the production domain points to Shopify.
- Check important product and collection pages.
- Activate and validate the planned 301 redirects.
- Test important old WooCommerce URLs.
- Check for redirect chains and loops.
- Confirm that important pages are indexable.
- Inspect canonical tags and robots directives.
- Check the Shopify XML sitemap and robots.txt.
- Validate product and breadcrumb structured data.
- Test mobile navigation, cart, and checkout.
- Verify Google Analytics 4 and ecommerce events.
- Check important landing pages for unexpected errors.
Post-Migration SEO Checklist
- Submit the production Shopify sitemap in Search Console.
- Inspect important URLs using the URL Inspection tool.
- Monitor indexing and crawl reports.
- Compare organic clicks and impressions with the baseline.
- Review organic landing-page performance in GA4.
- Investigate broken redirects and unexpected 404 responses.
- Update internal links pointing to old URLs.
- Check product, collection, and blog metadata.
- Review structured data and rich result eligibility.
- Monitor ecommerce conversion and revenue tracking.
- Maintain permanent redirects for at least one year.
- Document issues and verify corrective changes.
WooCommerce to Shopify Migration: DIY vs Professional Migration Services
You can migrate from WooCommerce to Shopify with manual exports, a migration app, or a professional developer. The right choice depends on your store’s complexity, how much organic traffic it earns, how much custom functionality it has, and how much data needs to move.
Option 1: Manual WooCommerce to Shopify Migration
A manual migration means exporting your WooCommerce data, preparing it, importing it into Shopify, and configuring the new storefront yourself. It can work for smaller stores with simple catalogs, little customization, and straightforward content. Even then, set aside time for product variations, SEO metadata, redirects, images, content relationships, and testing.
Option 2: Use a Migration Application
Migration apps can automate parts of the transfer, such as products, customer records, order history, and categories, depending on the app. Before you pick one, find out:
- Which WooCommerce data fields it supports.
- Whether it transfers product variations and custom attributes.
- How it handles images and product relationships.
- Whether it supports SEO metadata.
- Whether it can generate or import URL redirects.
- How it reports errors and incomplete records.
- Whether you can test before the final migration.
An app that handles product migration doesn’t necessarily preserve your SEO, so confirm each requirement on its own.
Option 3: Hire a Professional WooCommerce to Shopify Migration Developer
A developer is worth considering when the store has a large catalog, custom WordPress functionality, complex URL structures, significant organic traffic, or several third-party integrations. A well-planned migration covers more than the storefront design. It should also account for data integrity, SEO metadata, URL mapping, redirects, theme functionality, and post-launch validation.
When you evaluate developers, ask for a clear scope covering:
- Existing website assessment and migration planning.
- Product, category, page, and blog content migration.
- SEO metadata export and transfer.
- URL mapping and 301 redirect implementation.
- Shopify theme development and customization.
- Third-party app and API integrations.
- Technical SEO validation and launch support.
- Post-launch troubleshooting and monitoring.
For businesses that also need custom ecommerce development, explore DesignerPK’s WordPress and eCommerce development services.
When Should You Consider Professional Shopify Migration Assistance?
Outside help makes the most sense when a mistake could hurt revenue-generating pages, or when the WooCommerce store has requirements that standard imports can’t reproduce. Consider it if:
- Your store has hundreds or thousands of products and variations.
- Your WooCommerce site earns significant organic search traffic.
- Many product and category URLs have valuable backlinks.
- You use Yoast SEO or Rank Math with extensive custom metadata.
- Your WordPress site relies on custom plugins or integrations.
- You need custom Shopify theme functionality.
- Your migration involves complex inventory or fulfillment systems.
- You want technical SEO testing before and after launch.
Whoever you hire, define deliverables, responsibilities, testing procedures, and post-launch support before development begins.
Frequently Asked Questions About WooCommerce to Shopify SEO Migration
Can I migrate from WooCommerce to Shopify without losing SEO rankings?
You can greatly reduce the risk by preserving important URLs, transferring SEO metadata, setting up 301 redirects, keeping internal links current, and validating your technical SEO settings. No process can guarantee identical rankings, though, because search engines have to recrawl and reassess the new site.
Does Shopify automatically import WooCommerce SEO data?
No. A standard product or content migration doesn’t necessarily carry over SEO information from WordPress plugins. SEO titles, meta descriptions, canonical settings, indexing directives, and custom structured data need their own migration process (see Step 3).
Can I transfer Yoast SEO data from WordPress to Shopify?
Yes. Yoast provides a Shopify SEO data migration process built on exported SEO information and a supported import workflow. Afterward, check the imported metadata on the Shopify pages and inspect the published HTML.
Can Rank Math metadata be migrated to Shopify?
Yes, with some manual work. You can extract Rank Math’s SEO information from WordPress and map it to Shopify’s supported SEO fields, but the data needs to be prepared and validated first. The original plugin settings won’t work in Shopify as they are.
Will WooCommerce product URLs remain the same after migration?
Not necessarily. Shopify uses fixed URL structures for products, collections, pages, and blog posts. If a WooCommerce URL changes, create a permanent redirect to its new Shopify destination.
How long should I keep 301 redirects after migrating?
Google recommends keeping permanent redirects for at least one year after a site move. For URLs with valuable backlinks or continued customer references, keeping them longer is often worthwhile.
Does Shopify automatically generate an XML sitemap?
Yes. Shopify generates one at /sitemap.xml on your store’s domain. After launch, confirm that it loads and submit it through Google Search Console.
Can I keep the same domain when moving from WooCommerce to Shopify?
Yes. You can generally connect your existing custom domain to Shopify instead of changing your public address. Individual product, collection, page, and blog URLs may still change and will need redirects.
What happens to WordPress blog posts after migration?
They need to be moved into Shopify’s blog structure. Keep each post’s content, images, headings, metadata, and internal links, and create redirects wherever the URL changes.
Will my WooCommerce customer passwords transfer to Shopify?
Generally not. Standard migration methods can’t convert WooCommerce password hashes into usable Shopify passwords, so plan for customers to reset their passwords or activate their accounts (see Step 2).
How long does a WooCommerce to Shopify migration take?
It depends on product volume, content complexity, custom functionality, integrations, design requirements, and the amount of SEO work. A small store with simple requirements will take far less time than an established store with a large catalog and heavy customization. Get a project assessment before you commit to a launch date.
Should I delete my WooCommerce website after migration?
Not right away. Keep secure backups of the site, its database, and your migration records so you can investigate missing content, metadata, or redirects. You can retire the old hosting once the migration is validated and you no longer need it.
Can a Shopify migration improve website speed?
Not automatically. Moving to Shopify changes your hosting and storefront infrastructure, but theme quality, image sizes, app scripts, and third-party integrations still determine how fast pages load. Test the new store with PageSpeed Insights and real-user performance data.
What should I do if organic traffic drops after migration?
Compare Google Search Console performance against your pre-migration baseline, then work through the diagnostic table in Step 8: indexing status, canonical tags, redirect responses, key landing pages, and crawl errors. Verify GA4 tracking too, since a tracking gap can look like lost visitors.
Final Thoughts: Protect Your SEO Investment During a Shopify Migration
Moving from WooCommerce to Shopify takes more than transferring products and choosing a theme. Store data, URLs, SEO metadata, links, structured data, and technical SEO settings all need to be handled together.
The approach that holds up best is to document the current site first, build an accurate URL map, transfer content and metadata, set up your 301 redirects, and validate the new storefront before and after launch. Keep Google Search Console and GA4 in place afterward so you can investigate any change in visibility or conversions with real data.
Careful planning can’t promise unchanged rankings or rule out temporary fluctuations. It can prevent the avoidable technical mistakes that put an established store’s search visibility at risk.
Planning to Move Your WooCommerce Store to Shopify?
A poorly planned migration can put valuable organic landing pages, product information, backlinks, and customer journeys at risk.
DesignerPK provides WordPress and ecommerce development, website troubleshooting, and technical solutions for businesses planning to improve or rebuild their online stores. Get guidance on your migration requirements, including store data transfer, Shopify development, SEO preservation, URL redirects, and technical validation.
Plan your Shopify migration with a clear technical strategy.
Schedule Your Free Migration Consultation
Explore DesignerPK’s eCommerce development services to learn more.